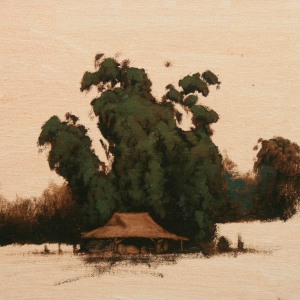
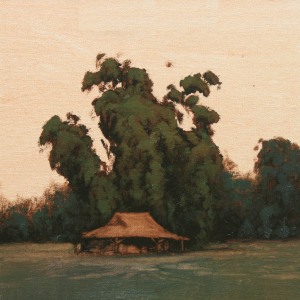
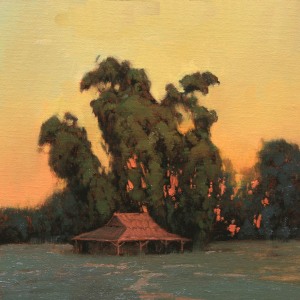
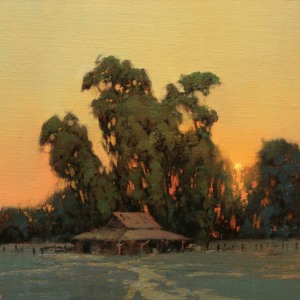
Many people have always enjoyed my process for painting so I’ve posted a series of images showing the progression of a recent painting. This particular type of painting with it’s moody feeling are most often created through a process of composing. I bring elements that I’ve seen on my travels and experiences together to create works that are uniquely original. Some of the most important elements in these pieces are the shapes and very close hues, values and temperature shifts. I’ve explained each step of the process below.

Step 1: The first thing I do is create the basic shapes of the image using a mixture of Sap Green and Alizarin Crimson. This mixture of colors is very dark but transparent and extremely rich in color. It’s important to create shapes that are interesting. This is the case for both the positive and negative shapes. Once I block in the shapes I take a Q-tip and begin to remove some of the paint to reveal the form of the objects.

Step 2: I then begin to add the color to the forms. It’s important to keep my color values very close and temperature shifts slight.

Step 3: I continue to add colors to the forms as well as the foreground. Notice how close the values remain in the forms. The contrast will come has I paint the sunset sky later in the process.

Step 4: I now begin to block in the sky using a very warm mixture of paint. Though these color may appear bright they are actually quite grayed down on my palette, almost muddy.

Step 5: I continue to paint the sky and add the sky holes in the trees. This is where the most pure color will be found. These sky holes will be softened as part of the final steps in the process. Tree holes are often used to create trunks and branches. This technique is used to create a more natural and believable tree.

Step 6: I continue to adjust the colors of the sky and add the sun. Foreground is being refined. Colors of barn are refined. Values are still close on all the forms allowing the light behind the trees to play the major role in the piece.

Step 7: Edges in the painting are softened, especially sky holes in the trees as well as the edges of the trees and barn.
I am so glad I came over from facebook to read your commentary. Your thought process notes are very helpful., and make me want to try oils. Lovely light in this and the tree shapes are really beautiful.
Thanks Robin, glad you found it helpful.
I followed the sonoma plein air website to your site — the beautiful paintings there are to die for! I really love the atmosphere in all your paintings, and the trees full of spirit. I guess you do not have time to teach workshops since they are not listed on your website. Pity for me, but understandable. It is very helpful to see here how your paintings are developed. Thanks a lot for sharing…
Ying,
Thanks for the kind words. No classes planned at the moment. I’m glad you found the photos of the progression helpful.
-Cheers
Kevin, thank you for your painting progression example, it is much appreciated. Is this an example of a studio painting progression, or a plein air? I ask because I’m curious if you let the initial block in dry somewhat before adding the color layers. Are you using a Liquin medium in this example?
-Pete
Hey Pete,
No, I don’t let the initial, or any layer, dry before adding color. I paint in the Alla Prima style, starting and finishing a painting in a single sitting. The requires a very light touch when adding each layer of paint. I have used Liquin but lately I’ve been using a simple oil painting medium. Hope this helps.
Nice to see the way you work! I am wondering what are you using for surfaces? I noticed you use Signature canvas? I am a junkie for surfaces and linens used by artist. I am a fan of your work and thanks for the demo!
Ben
Hey Ben,
Thanks. I use Signature Canvas as my supplier and I use the #166 acrylic primed linen. For paintings 16 x 20 and smaller I have the linen mounted on gatorboard and anything larger I stretch myself. Hope this helps. if you give them a try please mention my name. They’re great people to work with.
-Kevin
Hello Kevin,
Your work is wonderful. Im much more post impressionist and colorist. Is your work more towards tonalism or can you be on either side. Just yummie work.
Ct
Hi,
Thanks for your comments and kind words regarding my work. Yes, I do both tonal work as well as local color, just depends how the mood strikes me any given day.
Thanks again,
Kevin
Fantastic demo!
Thanks 🙂
Thanks for this great demo. Nice to see how the “holes” make the trees, something I’ve often done but was told that it was a bad habit by a few instructors. What do they know? 🙂
PS: Where do you find all those amazing frames? Are they all antique?
Thanks. I find this technique very affective when comes to tree holes, they just look more natural. It’s certainly NOT a bad habit, especially if it works.
All the frames that look like antiques are antiques. They’re becoming harder and harder to find, especially the real nice ones.
Thanks again.
Kevin, Beautiful work. Would you mind listing the colors on your palette that you used for this painting?
Thanks,
Here’s what my palette consists of
Sap Green
Ultramarine Blue Deep
Windsor Blue (Red Shade)
Cad Yellow Lemon
Cad Yellow Medium
CAd Red Medium
Alizarin Crimson
Thanks for the reply Kevin, I really like your work. I am also a fan of Inness, Bruce Crane, Francis Murphy and most of the tonalist painters, which I assume you are familiar with.
I just found your site after a review of the Carmel show. Love the approach you take to your painting and the results you are getting. Continued success.
Cheers,
Weegie
Thanks Weegie